The Payment Requests feature allows staff to request payments from the Treasury department of their organization for several reasons – expense reports, vendor expenses, contributions to political committees and donor contribution refunds. The My Payment Requests guide explains the request process in detail. Treasury staff members can take action on the requests with options to Approve, Pay or Reject a Payment Request.
Getting Started
- To review all submitted payment requests, open the Financial Summary, left-hand menu of Crimson.
- Click on the Payment Approval dashboard button. Note: you must be enabled for these user rights Contact Customer Support if you need help accessing this feature.
- A list of requests that have been submitted by staff will display. Use the Quick Search field to find a payee/vendor or click the Search Filters button to view filters options to help narrow down the list.
Review and Completion
- Open a payment request. This will change the requestor’s status from Submitted to Under Review.
- Edit the information needed for FEC reporting in the Treasury section of the request.
- You can also view any attachments and/or details provided in the Ultimate Vendor section.
- Click
.
- Once completed and saved, you can take one of three actions in the lower left corner.
Approved - Invoice
Approve with this option if you would like to create an invoice for the payment. See Approved-Quick Pay below if you prefer to immediately create the payment/disbursement for this request.
- To create a new invoice for payment of the request, click Approved-Invoice.
- The new invoice will automatically generate and reside with the other Accounts Payable invoices in the Pay Invoice area of Crimson for review and payment on a date you choose.
Approved – Quick Pay
Approve with this option if you are immediately issuing a payment for the request.
- Click Approved – Quick Pay to automatically create a Expenditure record for the request.
- You may Edit the disbursement that appears, for example to add General Ledger details.
- You may use
to print at this time if needed.
- The disbursement will now be viewable from the Expenditure menu of Crimson.
Reject
- If a Payment Request needs to be rejected, we recommend adding a Comment with an explanation.
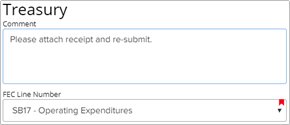
- Then click the red Reject button.
- This will automatically change the status from Under Review to Rejected. The submitter will see this status change in their My Payment Requests listing, and will receive a notification.
- The submitter can then edit and re-submit the request.
Donor Refunds
When a Donor Refund Payment Request goes through the approval and payment process, a Refund or Partial Refund adjustment is automatically processed for that Contribution. If the Contribution has an Exception Code of U1 – Refund Requested, it will be changed automatically to U2 – Refund Issued.
Editing Payment Requests
Once a Payment Request has been approved, with either the Invoice or Quick Pay option, it cannot be edited from the Payment Request. New Crimson records for the invoice or disbursement have been created based on the information provided. Changes can be made to those records if their status allows it.
Comments